Bringing your favorite animated heroes and villains to life means more than just a great costume; it means getting every detail right, down to the iconic weaponry. That's where DIY Cartoon Sword Props & Cosplay Guides become your secret weapon, turning imagination into a tangible, convention-ready masterpiece. Crafting your own cartoon sword isn't just about saving money; it’s about pouring your passion into a project and creating something truly unique that captures the spirit of your chosen character.
This isn't just a how-to; it's your comprehensive roadmap to becoming a prop-making pro, whether you’re a complete novice or looking to refine your skills. We'll walk you through everything from choosing the right materials to mastering those intricate painted details, ensuring your prop stands out in any crowd.
At a Glance: Your Prop-Making Journey
- Design First: Start with meticulous research and planning to perfectly capture your character's sword.
- Gather Your Arsenal: Equip yourself with the right tools and materials for the job.
- Build the Core: Learn to create sturdy templates and construct the foundational shape.
- Detailing is Key: Add the intricate textures, bevels, and embellishments that bring the sword to life.
- Paint It Perfect: Discover techniques for vibrant, durable finishes and realistic weathering.
- Safety & Longevity: Ensure your prop is safe for conventions and built to last.
Why Forge Your Own Blade? The Magic of DIY
You might wonder why bother crafting a sword when you could simply buy one. The answer lies in the deeply satisfying process of creation. Building your own prop offers unparalleled customization, allowing you to perfectly match the scale, color, and battle-worn details of your specific character. It’s also incredibly cost-effective, often saving you significant money compared to purchasing a pre-made replica. Beyond that, the sense of accomplishment you get from holding a prop you built with your own hands is truly unmatched. It transforms you from a consumer into a creator, deepening your connection to the cosplay and character you embody. Plus, understanding how to make your own props gives you incredible freedom for future projects.
Before you even touch a tool, it's wise to get a broader understanding of the subject. If you're keen to explore the rich history and diverse designs that make these weapons so captivating, our guide on All about cartoon swords offers a fantastic starting point, inspiring your next project with deeper context.
The Blueprint: From Concept to Cutting Mat
Every great prop begins with a solid plan. Rushing this stage often leads to frustrating do-overs later on. Think of yourself as an architect, meticulously designing every angle and curve.
Choosing Your Champion's Weapon
First, pinpoint the exact sword you want to recreate. Is it Cloud Strife's colossal Buster Sword, Link's iconic Master Sword, or perhaps something more whimsical like Finn's Grass Sword from Adventure Time? Gather as many reference images as possible: front, back, sides, close-ups of specific details, and even screenshots from different angles if available. These images are your bible.
Once you've settled on your target, our comprehensive guide on finding the perfect cartoon sword design can help you break down intricate patterns and translate them into workable templates. This early planning ensures accuracy and saves headaches down the line.
Scaling It Right: Size Matters
A prop sword needs to be proportionate to you, not necessarily the character. If your character is a giant, their sword might look comically oversized on a human-sized cosplayer. Consider:
- Your height and build: How long can the sword be without dragging on the floor or getting tangled?
- Convention rules: Many events have strict length limits for props (often 4-5 feet). Check these guidelines well in advance.
- Transport: Can you safely get your prop to and from the event?
Use a measuring tape and compare your own height to the desired length of the sword in your reference images. It's often helpful to sketch the sword to scale on large paper or even cut out a rough cardboard silhouette to get a feel for its dimensions.
Assembling Your Armory: Essential Tools and Materials
Having the right tools and knowing your materials are fundamental to a successful build. Skimping here can lead to frustration and a subpar finish.
Picking Your Prop’s Core Material
For cartoon swords, a few materials dominate the DIY scene due to their versatility, safety, and ease of use:
- EVA Foam (Ethylene-vinyl acetate): This is the undisputed champion for cosplay props. It's lightweight, flexible, easy to cut and shape, and forgiving for beginners. Comes in various thicknesses (2mm to 10mm+).
- Pros: Lightweight, inexpensive, safe, easy to cut, shape, and sand.
- Cons: Can be easily damaged if not sealed and reinforced, less rigid than other options.
- PVC Pipe/Dowels: Excellent for creating rigid cores or handles, providing structural integrity.
- Pros: Very sturdy, adds weight for a more "real" feel, readily available.
- Cons: Can be heavy, requires specific cutting tools, not flexible.
- Worbla/Wonderflex: Thermoplastic sheets that become moldable when heated. Ideal for intricate details, curved shapes, or adding a hard, durable shell over foam.
- Pros: Very strong, holds shape well, self-adhesive when hot, durable.
- Cons: More expensive, requires a heat gun, can be tricky for large flat surfaces.
- Cardboard/Foam Board: Good for initial templates or very quick, lightweight props. Not recommended for durable, long-lasting pieces.
Your Essential Tool Kit
Don't let the thought of a "tool kit" intimidate you. Many items are household staples, while others are worthwhile investments for any serious crafter. Our guide on essential tools for cosplay crafting dives deeper, but here’s a quick overview:
- Cutting Tools:
- Utility Knife/X-Acto Knife: Sharp blades are crucial for clean cuts in foam. Always have extra blades on hand!
- Self-Healing Cutting Mat: Protects your work surface and your blades.
- Box Cutter/Snap-Off Blade Knife: Great for thicker foam sheets.
- Scissors: For paper templates and lighter materials.
- Shaping & Adhering:
- Contact Cement: The go-to adhesive for EVA foam, creates a strong, flexible bond.
- Hot Glue Gun: Useful for quick tacking or minor details (but not for structural bonds).
- Heat Gun: Essential for shaping EVA foam, sealing it, and working with thermoplastics like Worbla.
- Sandpaper/Dremel Rotary Tool: For smoothing edges, adding texture, and refining shapes. Start with coarse grits and move to finer ones.
- Measuring & Marking:
- Rulers (metal preferred), Straightedge: For accurate measurements and straight cuts.
- Measuring Tape: For larger dimensions.
- Pens/Markers: For tracing templates onto foam.
- Safety Gear:
- Respirator Mask: Crucial when working with adhesives, paints, and sanding dust.
- Gloves: Protect your hands from glue and paint.
- Safety Glasses: Always protect your eyes.
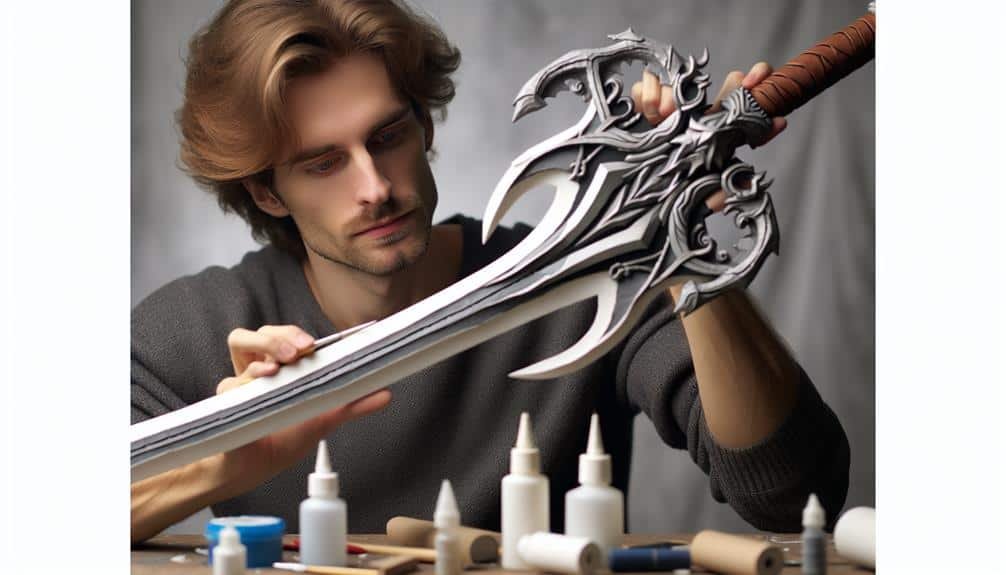
The Build: Bringing Your Sword to Life
This is where the magic happens. We’ll focus on EVA foam as the primary material, as it's the most common and accessible for DIY cartoon swords. For more detailed instructions on foam work specifically, you can refer to our guide on how to work with EVA foam for props.
Step 1: Template Creation
- Print & Scale: Print your reference images. If the sword is large, you might need to print it in sections. Software like Pepakura Designer can help scale and tile images for printing.
- Transfer to Cardboard: Carefully cut out your template sections. Tape them together if needed. Transfer this template onto sturdy cardboard or poster board. This makes it easier to trace onto foam and check proportions.
- Trace onto Foam: Place your cardboard template onto your EVA foam sheet. Trace around it firmly with a pen or marker. Be mindful of foam grain if it has one (though most cosplay foam is consistent). For symmetrical swords, you might only need to create half a template and flip it for the other side.
Step 2: Cutting & Shaping the Foam
- Sharp Blade, Clean Cuts: Using a sharp utility knife or box cutter, make confident, steady cuts. Multiple shallow passes are better than trying to cut through thick foam in one go, as this prevents tearing and results in cleaner edges.
- Beveling and Angles: Cartoon swords often have sharp edges and intricate bevels. Practice cutting foam at an angle to create these effects. A straightedge can guide your blade for consistent bevels.
- Layering for Dimension: Most cartoon swords aren't flat. You'll layer different thicknesses of foam to create depth. For example, a sword blade might be a 5mm core, with 2mm layers glued on top for raised details.
- Heat Shaping: Use a heat gun to gently warm sections of foam. This makes the foam pliable, allowing you to curve blades or handles. Once heated and shaped, hold it in place until it cools to set the new form.
Step 3: Core & Assembly
- Add a Core (Optional but Recommended): For longer or thinner swords, a PVC pipe or wooden dowel core is essential for rigidity. Cut a channel into one of your main blade pieces, insert the core, and then glue the second blade piece on top, sandwiching the core. This is especially important for the handle.
- Contact Cement Magic: Apply a thin, even layer of contact cement to both surfaces you want to join. Let it dry to the touch (it will feel tacky, not wet). Then, carefully align the pieces and press them together firmly. Once they touch, the bond is instant and strong, so accuracy is key!
- Reinforce the Handle: Ensure your handle is comfortable and strong enough to withstand handling. Layering foam around a PVC core is a common method. Consider adding finger grooves or textured wraps for better grip.
Step 4: Detailing & Refining
- Add Surface Details: Use thinner foam (2mm-3mm) for raised details, trim, and decorative elements. Cut these pieces meticulously and glue them onto the main sword body.
- Engravings & Etches: A Dremel tool with various bits can carve details directly into the foam. You can also carefully use a soldering iron (with extreme ventilation and caution!) to etch designs, but this requires practice as it melts the foam.
- Sanding & Smoothing: Use sandpaper (start with 120-220 grit, then move to finer 320-400 grit) to smooth out any rough edges, glue lines, or inconsistencies. A Dremel with a sanding drum is excellent for hard-to-reach areas.
- Gap Filling: Small gaps or seams can be filled with a foam clay, EVA foam filler, or even a flexible caulk/spackle designed for crafts. Once dry, sand smooth.
The Artistic Touch: Painting and Finishing
This stage transforms your grey foam creation into a vibrant, believable prop. Good painting can hide minor imperfections and elevate your sword to the next level.
Priming for Perfection
Before any color goes on, you need to seal and prime your foam. This step is crucial because:
- Sealing: EVA foam is porous. Sealing prevents it from absorbing paint, which would lead to a dull finish and require excessive paint.
- Priming: Provides a smooth, even surface for your paint to adhere to, ensuring vibrant colors and preventing chipping.
- Plasti Dip: A rubberized spray coating that is very popular for foam props. It seals and primes while maintaining flexibility, preventing cracking. Apply 2-3 thin coats.
- Flexbond/Wood Glue: Brush-on options that dry flexible. Apply several thin coats, sanding lightly between coats for a smooth finish.
Mastering the Color Palette
Reference images are critical here. Identify the base colors, highlight colors, and any weathering effects. Our guide to mastering prop painting techniques offers in-depth advice on various applications and effects.
- Base Coats: Apply your main colors using acrylic paints. Spray paint can offer a smooth finish for large areas, but use it in thin, even coats to avoid drips. Brush painting works well for smaller details.
- Layering & Shading: Don't just paint one flat color. Add darker shades in recessed areas for shadow, and lighter shades on raised areas to create highlights. This adds depth and dimension.
- Weathering & Detail:
- Dry Brushing: Dip a brush in a small amount of paint (metallic silver for worn edges, dark brown for dirt), wipe most of it off, and then lightly drag the brush over raised areas to create a chipped or worn effect.
- Washes: Mix a small amount of dark paint with water or a medium to create a thin, translucent wash. Apply it over textured areas, then wipe off the excess. The wash will settle into crevices, enhancing details and adding grime.
- Blood Spatter/Glow Effects: Use specialized paints or techniques to add these iconic cartoon elements.
- Sealing the Deal: Once your paint is fully dry, apply a clear sealant.
- Clear Coat Spray: A matte or satin clear coat spray protects your paint job from scratches and wear. Choose one that is flexible if your prop has flexible parts.
- Brush-on Sealants: Offer more control and thicker protection for high-wear areas.
Convention Ready: Safety, Durability, and Transport
You've built a masterpiece, but it's not truly complete until it's ready for its debut.
Prop Safety & Convention Guidelines
Conventions have strict rules for props to ensure everyone's safety. Always check the specific convention's website, but general rules usually include:
- No live steel: Real swords are strictly forbidden.
- Non-sharp edges: Even prop blades must not have sharp points or edges that could injure someone. Sand down any potentially hazardous points.
- Length limits: As mentioned, be aware of maximum length.
- Peace-bonding: Many conventions require props to be "peace-bonded" (tied or zip-tied in a way that prevents them from being brandished or drawn).
- No projectiles: Props that fire actual projectiles (even soft ones) are usually banned.
Understanding understanding convention prop safety guidelines is non-negotiable. Breaking these rules can lead to your prop being confiscated or even you being removed from the event.
Building for Durability
Even cartoon swords need to withstand the rigors of a convention floor.
- Reinforcement: Ensure all joints are solid. If your sword is thin, consider adding a thin strip of craft foam or Worbla to the edges for extra protection against dings.
- Strong Handle: The handle is the most-handled part. Make sure it's comfortable, robust, and securely attached to the blade.
- High-Quality Sealant: A good clear coat protects your paint job from incidental bumps and scrapes.
Transporting Your Creation
Think about how you'll get your sword to the event. Will it fit in your car? Can you carry it easily through public transport? Consider:
- Carrying Bags: A sturdy guitar case, a fishing rod bag, or even a custom-made fabric sleeve can protect your prop during transit.
- Disassembly: If your sword is particularly large, consider designing it to break down into smaller, more manageable pieces (e.g., blade detaches from the handle).
Common Questions from Aspiring Prop Makers
Crafting is a learning process, and it's natural to have questions. Here are some common ones:
"My foam edges look messy after cutting. How do I get them smooth?"
The key is a consistently sharp blade and multiple shallow passes rather than one deep cut. If you still have rough edges, light sanding with 220-grit sandpaper can clean them up. For extremely smooth edges, apply a thin layer of Flexbond or a similar sealant and sand it after it dries.
"My sword feels flimsy. What did I do wrong?"
Often, this means the core isn't sufficient, or the foam layers aren't thick enough for the prop's length and design. For longer blades, a PVC pipe or wooden dowel core is almost always necessary. Ensure your contact cement bond is strong across all surfaces.
"My paint is cracking or chipping. How do I fix this?"
Cracking or chipping usually happens because the paint isn't flexible enough for the material (especially foam). Make sure you're using a flexible primer like Plasti Dip or Flexbond and that your chosen paints are designed for use on flexible surfaces. Also, a flexible clear coat sealant is essential as a final protective layer.
"How do I make my sword glow like it does in the cartoon?"
Integrating LEDs (Light Emitting Diodes) is the most common method. You can embed LED strips or individual lights within clear or translucent acrylic/resin sections of your sword, connecting them to a small battery pack and switch hidden in the hilt. This requires some basic electronics knowledge but is very achievable for DIYers.
The Next Chapter: Advanced Techniques
Once you've mastered the basics, a world of advanced techniques awaits:
- Resin Casting: For intricate, identical parts or translucent glowing elements.
- Thermoforming: Using vacuum forming to create complex, hollow shapes from plastic.
- Electronics Integration: Beyond simple LEDs, consider sound boards, reactive lighting, or even small motorization for moving parts.
- Airbrushing: Achieve incredibly smooth gradients and detailed weathering effects with an airbrush.
Don't feel pressured to tackle these immediately. Build your foundation, experiment, and enjoy the process.
Maintaining Your Masterpiece: Care and Storage
Your hard-earned prop deserves to last.
- Clean Gently: Use a soft, damp cloth to wipe off dust or smudges. Avoid harsh chemicals that could damage paint or sealant.
- Avoid Extreme Temperatures: Don't leave your prop in direct sunlight or a hot car, as foam can warp and paint can blister.
- Proper Storage: Store your sword flat or hanging, never leaning against a wall where it could bend over time. Keep it in a dust-free environment.
Your Journey Begins Now
Crafting your own DIY cartoon sword prop is an incredibly rewarding endeavor. It's a chance to learn new skills, express your creativity, and bring beloved characters to life in a tangible way. Don't be afraid to make mistakes; they're an integral part of the learning process. Each cut, each layer of glue, and each brushstroke brings you closer to realizing your vision. So gather your supplies, fire up your imagination, and get ready to forge a prop worthy of any hero. The only limit is your creativity.